Codenotary is the only decentralized, secure and blockchain based Kubernetes solution out there to guarantee the integrity of the containers running in a k8s cluster. In this blog, we will show you how to find and continuously monitor for unwanted Docker /images/blog in your K8s environment by using Codenotary and its CLI tool, vcn. We will also show you how you can visualize everything in a Prometheus time series database using Grafana. The blockchain and smart contract based Codenotary vcn tool allows you to protect your environment so only the containers signed by you (or by another signer you trust) and therefore recognized by you as ones you want to use, will be clearly identifiable as “Trusted”.
The applications we will be using/referencing that you should be familiar with in this blog are:
- Docker
- Kubernetes
- Prometheus
- Grafana
Now, let’s protect our environment.
To begin with, you will need to start a free trial with Codenotary. If you don’t have one yet, you can do so here.
Once you have your free trial up and running, let’s get started.
Getting Started and Cloning the Repo
First off, there’s another Github project called vcn k8s we are going to clone. The vcn k8s project is a watchdog that continuously verifies the integrity and authenticity of the containers running in a k8s cluster. To clone, we use:
git clone https://github.com/vchain-us/vcn-k8s
Once we have our clone, we change the directory to the correct corresponding folder.
cd vcn-k8s
Running a list of the folder contents, we see a Docker Compose file, Dockerfile, Kubernetes DaemonSet, and also the verify.Prometheus.

The vcn command actually runs inside the pod as we will see later on. Of course, we can check all the files out whenever we want but for now we are going straight into building our container.
Building Our Docker Container
So we enter the command:
docker-compose build
And now everything gets downloaded and our container is built.
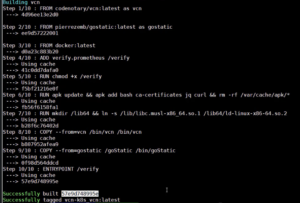
Next, we want to tag the container and upload it to Docker Hub. In your case, just use your own dockerhub.com account so your code would look like this (below):
docker tag 57e9d748995e (your dockerhub.com account)/vcn
Now, we want to push our container onto Docker Hub.
docker push (your dockerhub.com account)/vcn
When the command runs through successfully our Docker image has been uploaded and tagged correctly.
Working with Our DaemonSet
The next thing we want to do is to change the DaemonSet so that it is going to use the image we just uploaded to DockerHub.
To do so we’ll enter the command:
vi vcn-k8s-daemonset.yaml
Now, let’s get into the DaemonSet.
Here we find a default image already entered and we will replace it with our own Docker Hub image.
**spec:
containers:
# securityContext:
privileged: true
image: _(your dockerhub.com account)_/vcn:latest**Our DaemonSet tells Kubernetes to deploy a pod to every Kubernetes node automatically.
We also see the annotation that tells the Prometheus server inside our Kubernetes deployment that the pods can be scraped and port 9581 is used by Codenotary vcn.
We go ahead and save the Daemonset configuration file to reflect our changes.
Next, we deploy the Daemonset into Kubernetes using:
kubectl apply -f vcn-k8s-daemonset.yaml
Once it has been deployed into Kubernetes, we see:

Now, we can check the pods and see if they are running. Specifically, we check for Codenotary-vcnverify, which we see below in the first 2 returned lines.
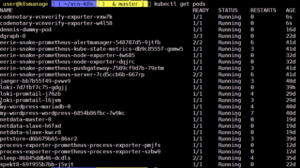
And they are already running. Perfect!
That’s basically it. Right? Well, not so much because now we want to visualize the data.
Making the Data Useful
Currently, what happens is that the two pods running are each on one of the Kubernetes nodes.
So we need to check if our Prometeus is already scraping the data. With Kubernetes you don’t need to configure it in any way because the cool thing on DaemonSet is that when you have a Prometheus running inside of your Kubernetes, you are able to work with annotations to make sure everything is crawled automatically when the pods go online. This way we can continuously monitor for unwanted and foreign Docker /images/blog in our environment.
Next, we will check our Prometheus server.
Testing Our Prometheus Set Up
First, we need to make sure our targets are correct…
…which they are.
Next, let’s scroll down and check if the Prometheus finds the Codenotary container and if they are scraped correctly.

At first, the container will appear as down and be listed as invalid. This is because the application needs to detect and verify each running container. After a few seconds, we check it again and the target is up and the data is being scraped.

The 2nd container is still down, but it takes only a couple of seconds before it is also up.
Now, we can start checking to see if the data is coming in on the Prometheus graph page.
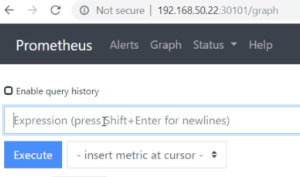
We just go for the vcn verification level metrics.
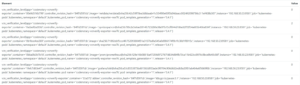
Here we type vcn_verifation_level and run the query.
Yes. The data is coming in now. As we can see, we have various containers with the status value indicated for each. (In this demonstration, one of the containers is already signed, which is why we see a different value on one of them i.e. 2 instead of zero.)
Visualizing Codenotary Results and Dashboard Integration
Now to see how everything is working together, we want to import or create a Grafana dashboard.
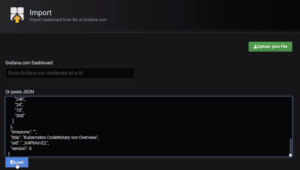
After pulling up our dashboard list, we select ‘Import Dashboard’ on the right-hand side.
Next, we copy and paste the dashboard JSON file content and load it. Alternatively, we can create the dashboard ourselves based on the Prometheus data.
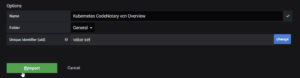
After importing the dashboard, we select it in the Grafana dashboard navigation.
And here we go! Our ‘Container Status’ viewer is up.
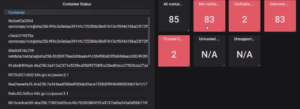
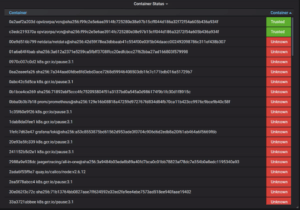
We see there are non-verifiable and verifiable containers. We can also see after expanding the ‘Container Status’ panel window that the verifiable and non-verifiable containers are labeled as ‘Trusted’ and ‘Unknown’ along the inside right side of the window. Here we can see the container (the 3rd one in the list – netdata/netdata) we will be signing later in this demo is listed as ‘Unknown’.
Trusting Our Docker Images
Next, we want to trust our container /images/blog and mark them to be production ready. In our example, we go for the netdata container. So let’s check what container image is used by the NetData pods with the command:
kubectl describe pod netdata-master-0
Now, we scroll back up through the description we just retrieved and locate the image that is getting pulled.

Now, we pull the image ourselves locally in order to sign it using CodeNotady vcn:
docker pull netdata/netdata:v1.13.0
Codenotary Trust Process
The next step for us is to sign the image with our Codenotary vcn tool so we mark it in an immutable way that we trust this container. Optionally, we can use the switch --public if we want to disclose our identity so others can rely on us. As we sign our Docker image, we make sure to add docker:// in front of the image name (including the tag) as demonstrated below:
vcn s –public -y docker://netdata/netdata:v1.13.0
Now, we need to put in our vcn credentials for the Keystore (private key) in order to sign the asset onto the Codenotary blockchain.

Here we go. And now our image is signed!

Before checking the dashboard, we will verify our local image for good measure.
vcn v docker://netdata/netdata:v1.13.0
Here we see our image is, in fact, verified as well as we see all of its attributes.

In the dashboard, we can see that our data container is now verified as ’Trusted’.

Using Codenotary vcn sign, we can start signing all of the containers, we approve and trust to run within our Kubernetes environment.
It’s as simple as that.
There’s a free trial of course. Actually, if you are non-commercial and open source contributor, just sign up with Codenotary and you can do exactly what we just showed you forever for free.
If you liked this tutorial, check out our other integrations here.